
Prerequisites:
- Selenium IDE - Please go through Selenium IDE posts (i.e. from Post#1 What is Selenium? to Post#27 Finding Locators for UI elements using the Selenium IDE's recording feature )
- Ensure that the Selenium Standalone Server is started as explained in Post# 5 Start the Selenium Standalone Server
1. Record a Test in Selenium IDE
1. Launch Firefox Browser and click on 'Tools' Menu -> 'Selenium' IDE option as shown below:

2. Ensure that Selenium IDE is launched as shown below:

3. Open any website say www.google.com in Firefox Browser as shown below:


5. Turnoff the 'Recording' button on the Selenium IDE to stop recording as shown below:

6. Ensure that the recorded commands are displayed under the table tab as shown below:

2. Enable 'Experimental Features' Option
1. In 'Selenium IDE', click on 'Options Menu' and select 'Options' option as shown below:


3. Change the Recorded code format from HTML to 'Java / Junit4 / Remote Control '
1. Click on 'Options' menu and select the 'Format' option to view the 'Format' Sub menu options and ensure that the 'HTML' option is selected by default a shown below:
1. Click on 'Options' menu and select the 'Format' option to view the 'Format' Sub menu options and ensure that the 'HTML' option is selected by default a shown below:

2. Now change the selection from HTML to Java/ Junit 4 / WebDriver as shown below: (If you want your tests to be written using Selenium WebDriver commands & Java Language and you want your tests to be Run using Junit 4 framework, then you have to select this option else you have select other options based on your requirement)


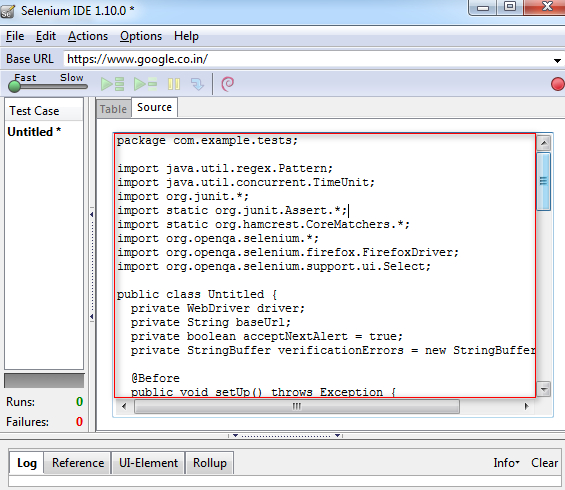
4. Ensure that Junit 4 -Selenium WebDriver - Test java code is displayed in the Selenium IDE's Source tab as shown below:
4. Create a Package named "firstPackage" under the 'Selenium WebDriver' configured project
1. Create and configure a project as explained in Post# 3 Configure Projects in Eclipse IDE to work with Selenium WebDriver
2. Right click on the Project and select 'Package' option as shown below:

3. Ensure that 'New Java Package' dialog is displayed, enter "firstPackage" as Package Name into the 'Name' text box and click on 'Finish' button as shown below:

4. Ensure that the New Package got added as shown below:

5. Create a New Class under the above created Package
1. Right click on the newly created package and select 'Class' option as shown below:

2. Ensure that 'New Java Class' dialog is displayed, type "ImFeelingLucky" class name into the 'Name' text box and click on 'Finish' button as shown below:

3. Ensure that the New Class file named as "ImFeelingLucky' got added under the "firstPackage" as shown below:

6. Copy the code that is generated and converted to Java/Junit4/WebDriver in Selenium IDE and paste into Eclipse IDE's newly created class
1. Copy the source code that is generated by recording and converted to Java/Junit4/WebDriver format as shown below:

3. Ensure that few Eclipse Errors got displayed after pasting the source code as shown below:

7. Lets Rectify the first Eclipse Error - Package error
1. As only one package declaration is allowed in a class, but after copying the source code there are now two packages as shown below:

2. As 'Copied code's package' is not available in the Eclipse IDE, lets remove or comment it to resolve this error as shown below:

8. Rectify the second Eclipse Error - Two Class Names Error
1. A single Class File can have only one Class declared inside it, but after copying the source code there are now two class declarations with different names as shown below:

2. Remove or Comment the existing class declaration as it doesn't contain any code or we are not going to write any code into it (as shown below):

9. Rectify the third kind of Eclipse Error - Class declaration name in the Class file should have the same name as the Class file Name error
1. Observe that the Class file name is different from the Class declaration name as shown below:

2. Change the Class declaration name as Class File Name as shown below:

3. Ensure that all the errors got resolved and no others errors exist in the source code.
10. Remove the warning Messages
1. Observe that there are three warning message highlighted in yellow color icon as shown below:

2. In this case, the warning message are displayed for the three import statements as these import statements are never used in this source code (You can know this by mouse over this warning icons) as shown below:

3. Remove or comment these import statements to resolve (as shown below):

4. Ensure that the warning messages with the import statements got resolved now.
5. Observe that there are two methods that are throwing warning messages as they are never used locally as shown below:

6. Comment these methods to resolve the warning messages as shown below:

7. After commenting the above two methods, observe that there is one more warning message displayed as shown below:

8. Comment the above displayed warning message to resolve it as shown below:

9. Now ensure that there are no more warning messages and finally select 'Save All' button on the Eclipse IDE to save all the changes as shown below:

11. Remove the selenium command, so that after running the test, the selenium server wont close the browser on which it runs the test
1. Remove or Comment the "driver.quit( )' in the code ( Will explain about this command in upcoming posts, for now comment it blindly):

So we have finally finished creating a Selenium WebDriver test by following the below steps:
1. Creating a Selenium WebDriver test by using Selenium IDE's recording feature
2. Converted the automation code generated by the Selenium IDE from HTML format to the desired JUnit 4/Java/WebDriver format.
3. Copied the converted code and pasted it into the Eclipse IDE
4. Resolved the error messages and warning messages in the Eclipse IDE
Before running this code, we have to make sure whether a compatible firefox browser is installed to run this code. Lets do this in the next post and there after run this code.
Download this Project:
Click here to download this project and import into Eclipse IDE on your machine.
Please comment below to feedback or ask questions.
How to ensure whether the compatible Firefox Browser is installed for running the Selenium WebDriver tests will be explained in the next post.
